Tenders -Transaction Inquiry
- Dale Brittenham (Deactivated)
- Marrianne Williams (Unlicensed)
Tenders
Tenders themselves will still be created and flow to PRISM360 from WPAdmin. WPAdmin specific tender parameters will be displayed in the Admin Tool, but will not be editable.
WPAdmin
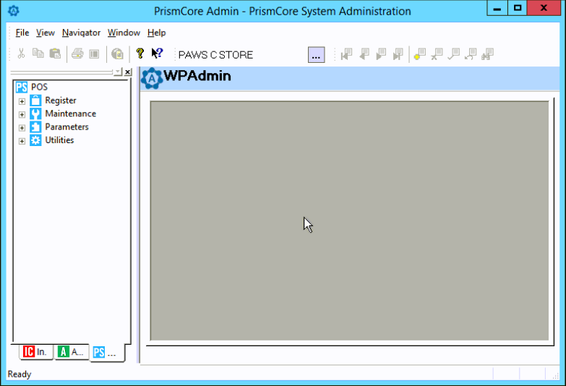
1. To Create/Modify a tender log in to WPAdmin.

2. Navigate to the POS tab and your screen should look similar to below.
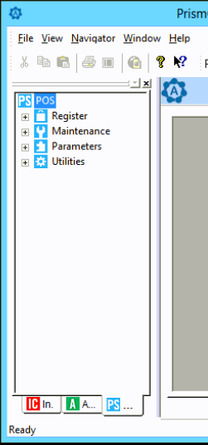
3. Select Parameters and your screen should be similar to below.
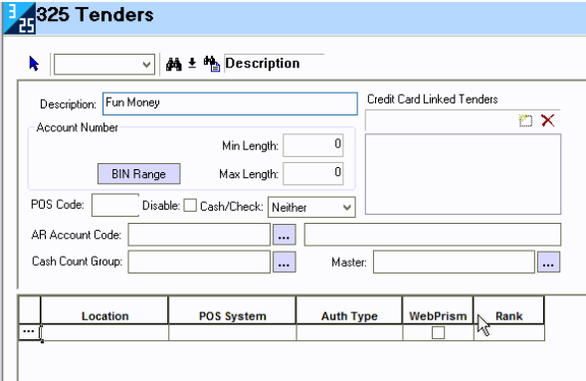
4. Select Tenders and your screen should be similar to below.
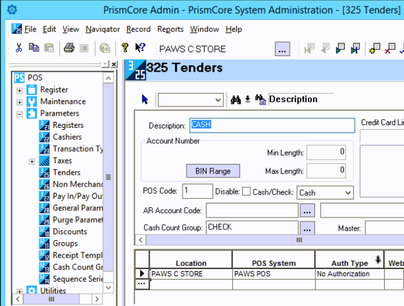
This option will be accessed to add tenders, view, modify or delete a tender type. Since there are a number of parameters to be set up for tenders, it is suggested that you call WinPRISM POS Support before adding, modifying, or deleting tenders here.
Note: Some fields for account tenders are overridden by Account Codes in
POS and Account Maintenance in Accounts Receivable. This is so some parameters can be specified for the individual account.
From the main Tender screen, you can click on the Quick Results button (small
binoculars), to get a select list of the tenders already defined.
Adding a Tender
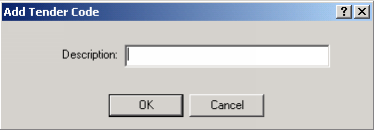
- Tenders must be added in WPAdmin and uploaded to the Cloud before they can be accessed at the register. To add a tender, click on the yellow plus sign, or tap the F4 key to bring up the following window.
- Type in a name for the tender and click the OK button or press the enter key on your keyboard.
3. Fill in the appropriate tender settings for each tender using the below information for Reference.
Field - Explanation
Account Number - Fill in this section if the tender requires an account number, leave these fields blank if it does not.
Required - If this tender requires an account number, place a checkmark in the box.
Pattern - If legitimate account numbers always start with a particular character or characters (i.e. Visa cards always start with the number 4), putting that character or those characters in this section allows WinPRISM POS to catch errors if a cashier attempts to enter a non-legitimate number.
Min Length - Fill in the minimum number of characters allowed in a legitimate
account number.
Max Length - Fill in the maximum number of characters allowed in a legitimate
account number.
Disable - Place a checkmark in this box if you wish to disable this tender.
Cash/Check - Pick one.
- Neither - Select Neither if this tender isn't cash or check.
- Cash - Select Cash if this tender is cash
- Cash & Change - If you will be using the Cash Count program, one (and only one)
tender will need to be set to "Cash & Change." You would normally make this setting on the Cash tender, as it is the tender that should be decreased when change is given out for other tenders, or pay outs.
Check - Select Check if this tender is check.
AR Account Code - If this tender is tied to an account, select the account code from the select list for this field. If the tender isn't tied to an account, leave this field blank.
Cash Count Group – Currently not available in PRISM360.
Master - Fill in the tender key the cashier will press to bring this tender up in a select list on the screen. Typically each of the credit cards are tied to a master of "Charge Cards" and when the cashier presses the Charge Cards tender key they get a select list containing all of the charge cards. Most other tenders that are added would have a "Master" set up as "Misc Tender" which would enable a cashier to press the Misc Tender key to bring them up on a select list. Also refer to the Groups section of this document.
In the bottom section of the window, select which locations this tender will be used in. Right click on the ellipsis and select each location from the list.
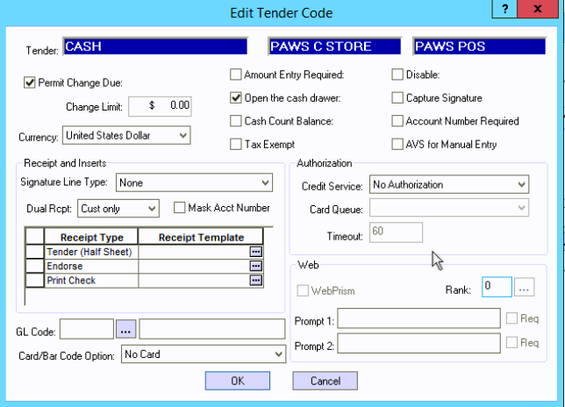
The next step is to double-click on the location and define how you want the tender handled.
Field – Explanation
Permit Change Due - If any customer would be allowed to get change back when using
this tender for a transaction, put a checkmark in the box.
Change Limit - If you wish to limit the amount of change a customer can get when using this tender, enter the limit in this field.
Currency - Please select "Canadian Dollar" or "United Sates Dollar" (whichever is appropriate) for this tender.
Amount Entry Required - If you want the cashier to manually enter the tender amount, place a check in the box by Amount Entry Required, or leave it unchecked if you want the tender amount to default to the remaining balance due of the transaction.
Open the cash drawer - If you want the cash drawer to open as a result of this tender being want the drawer to open if change is due, leave the box unchecked).
Cash Count Balance - Currently not available in PRISM360.
Disable - If you are setting this tender up for future use, and don't want the cashiers to use it until later, or have any other reason you don't want cashiers to use it, you can place a checkmark in the box next to Disable.
Capture Signature - If you have electronic signature capture devices connected to your
registers, and if this tender requires a signature, you can check the Capture Signature box to cause WinPRISM POS to retain the signature in a file.
POS Code - In the POS Code field, input a tender code that is not already in
use by another tender. A list of the default tenders and their tender codes is in Appendix A.
Receipt and Inserts –
- Receipts and Inserts are setup in the Cloud Admin.
Authorization - Most tenders don't require an authorization like you normally expect with credit cards. If the tender you are defining requires authorization, contact WinPRISM Support for the precise option to use.
Credit Service - Pick one.
- No Authorization - Use this option if WinPRISM POS doesn't need to get
an authorization for this tender's use.
- Manual Autho - Use this option if the cashier is to be prompted for an
authorization string they are to acquire from some other source.
- AR Gift Cert - Use this option if WinPRISM POS will need to get an authorization from a Gift Certificate account in WinPRISM's AR module
- Credit Card - Use this option if WinPRISM POS will need to get an authorization from a bank through a credit card processor.
Note: This option requires third party software, such as Shift4, which may
or may not be loaded on your system.
- Credit Card Manual - Use this option if the cashier is to be prompted for an
authorization string they are to acquire from some other source, usually from a bank through a credit card processor over the phone.
- AR Authorization - Use this option if WinPRISM POS will need to get an
authorization from an account in WinPRISM's AR module.
- Airtime Gift Card - This feature has not been implemented yet.
- IPAS Verification - This feature has not been implemented yet.
- Check Verification - This feature has not been implemented yet.
Card Queue - Pick one.
- Payment Authorization - Use this option if WinPRISM POS will need to get an
authorization from a bank through a credit card processor.
Note: This option requires third party software, such as Shift4, which may or may not be loaded on your system.
- Debit Authorization - Use this option if WinPRISM POS will need to get an
authorization from your campus debit card office computer. An interface is currently implemented for Blackboard.
- ICV/UPS Server - Do not attempt to use this; obsolete.
Timeout - Length of time WinPRISM waits for a response from an outside source.
Card/Bar Code Option - Pick one.
- No Card - No card is needed for this tender.
- UNO Card - UNO card setup.
- UNL Card - UNL card setup.
- CBORD Student Card - CBORD Student card setup.
- OMNI Card - OMNI card setup.
- Airtime Gift Card - Airtime Gift card setup.
- ISO Credit Card - ISO Credit card setup.
- CBORD Gift Card - CBORD Gift card setup.
GL Code - In the event your store is utilizing the General Ledger Module, you can select the GL code in the bottom of the window.
WebPrism - Place a checkmark in this box if WebPrism will be using this tender.
Rank - The order or priority of the tenders used by WebPRISM. In the Cloud Admin this is done Sort Order
Cloud Admin Tool – Tenders
Provides a way for development, support and store users to modify certain tender parameters for PRISM360 that do not exist in WPAdmin Tender Parameters. Tenders themselves will still be created and flow to PRISM360 from WPAdmin. WPAdmin specific tender parameters will be displayed in the Admin Tool, but will not be editable. PRISM360 tender parameters will be editable but will not flow to WPAdmin. When a tender is edited, the following fields are displayed. Those noted as '360 Parameters' are parameters that only exist in PRISM360.
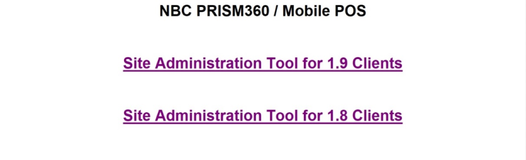
- Log into Cloud Admin Tool.
- Click the appropriate "Site Administration Tool" link for the store. If you are on PrismCore (WinPRISM) v28.1.13 or lower, you will use v1.8. Once you update to version 28.2.35 or higher, you will use v1.9.
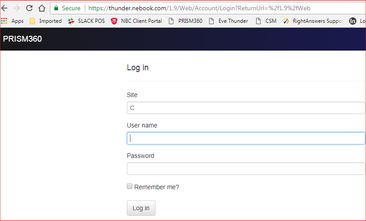
3. Log in with your credentials. The site is C plus your six-digit NBC account number.
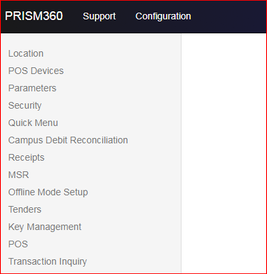
4. Select Configuration from top navigation bar. Then select Tenders from the left bar.
5. To access the additional parameters, including the specific PRISM360 POS Tenders, select the POS Tenders > Edit button.
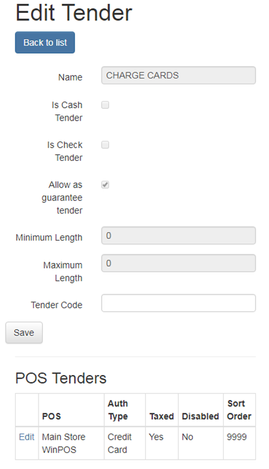
In the Admin Tool, when you edit a tender, the following fields display. Note: All these fields are from WPAdmin and only Tender Code can be edited.
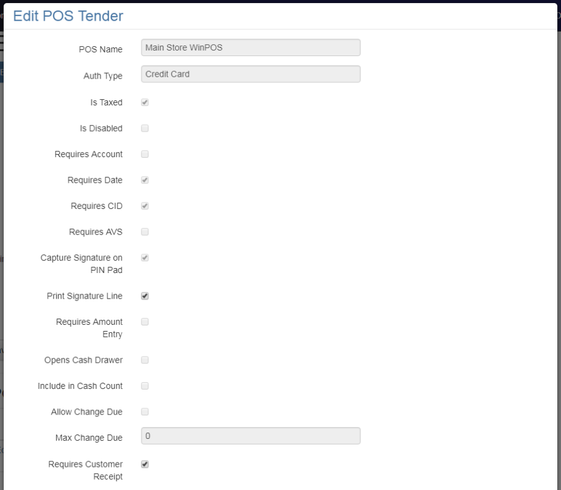
6. From the Edit POS Tender window, additional parameters display.
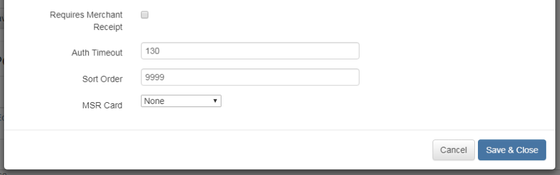
The sort order is the order that the tenders show up at the register/mobile phone.
The 9999 number may be changed 1, 2, 3 etc to change the order as the tender list appears on the register/mobile phone. If left at 9999, tenders will be in regular order, 0 sorts alphabetically.
Prism360 and Mobile will be affected on how the tenders show up on both. If they have Mobile and WinPOS, it will only affect mobile.
Note: Some are specific to WPAdmin, and some are specific to PRISM360 POS. Below is a list of all with that designation.
Below are all the fields that can be edited in PRISM360 POS.
Field Name | PRISM360 POS |
POS Name |
|
Auth Type |
|
Is Taxed |
|
Is Disabled |
|
Requires Account |
|
Requires Date |
|
Requires CID |
|
Requires AVS |
|
Capture Signature on PIN Pad |
|
Print Signature Line | Yes |
Requires Amount Entry |
|
Opens Cash Drawer |
|
Include in Cash Count |
|
Allow Change Due |
|
Max Change Due |
|
Requires Customer Receipt | Yes |
Requires Merchant Receipt | Yes |
Auth Timeout | Yes |
Sort Order | Yes |
MSR Card | Yes |
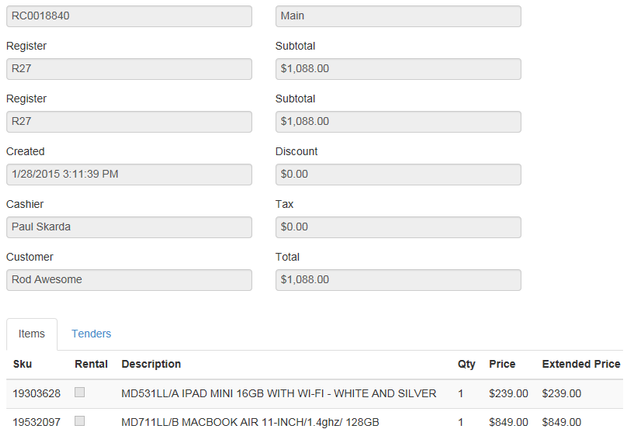
Transaction Inquiry
1. Transaction Inquiry allows you to view information about transactions done.
2. Select Transaction Inquiry from the main Cloud Admin Menu.
3. You can choose to view the transactions in a listing (default), or you can search for a specific receipt number by typing it into the search field and pressing enter.

Example:
4. Other options to search by are Date, Date Range, Customer# or Name, or by one of the Type selections are also available.
5. After searching if there is a list you can click on Name, Date, Location, Cashier, Customer or Total and sort in increasing or decreasing order.