Quick Menu in PRISMPOS
- Chris Johnson
Quick Menu in PRISMPOS
The Quick Menu mode allows you to add items on a PRISMPOS cash register that might not be needed on registers anywhere else. Quick Menus are configured in the cloud, and accessed by pressing the Special Items button on the cash register screen.
Configuring Quick Menus
1. Open your web browser (Internet Explorer, Google Chrome, etc.).
2. Go to http://thunder.nebook.com
3. Enter the Site, User Name, and Password. Site, will be entered with a letter "C" followed by your
Store Account Number'. Ex. "C123456" then your "PrismCore" Login credentials in the User Name
and Password fields.
4. Click Log in.
5. Once logged in click Configuration at the top of the Menubar.
6. Click Quick Menu Config from the menu on the left.
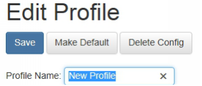
Add a new Profile
1. Click + New Profile.
2. This Profile is the new menu you will see at the PRISMPOS cash registers.
3. Start by changing the Profile Name from "New Profile" to a name that will work for what is in your
store.
4. Choose what option will happen after you complete the quick menu transaction at the PRISMPOS register:
Special Items: Choosing this option will return you to the special items select screen
360 Home: Choosing this option will return you to the main PRISMPOS menu screen
5. Choose which menu type you would like this profile to be:
Classic Special Items: Choosing this option will display the buttons as a select button listing on the
middle of the screen.
Quick Menu: Choosing this option will display the buttons on the bottom of the screen.
Attach a Quick Menu Profile to a register
1. Click Pos from the menu on the left side.
2. Click the down-arrow to view the list of POS available.
3. Select the appropriate POS from the list.
4. Select the register you want to attach this profile to.
5. Click Edit.
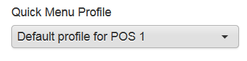
6. At the bottom of the Edit Register screen, under Quick Menu Profile, click the down-arrow and
select the profile you just created.
-
-
-
-
- Below is just an Example of NBC Testing System*****
Each store will have different ITEMS to utilize.
Configuring the New Profile
1. Click Quick Menu Config on the left.
2. From the Choose POS System down-arrow, and select the appropriate POS system.
The Edit Profile screen is three sections; "Search Items", "Organize" and "Edit".
3. Start under Organize.
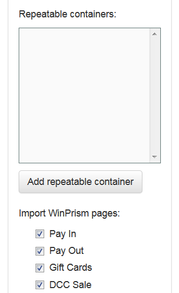
4. Note the bottom section labeled Import WinPRISM columns.
5. You are able to bring in Pay In, Pay Out, Gift Card, and DCC Sales from WinPRISM.
6. Check the boxes if you would like them to appear on your quick menu.
7. Look at the section that says Drag to reorder or nest items.
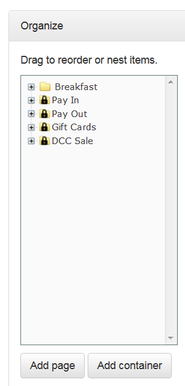
What you see listed are columns from the PRISM360 register screen that will appear when you press the Special Items button.
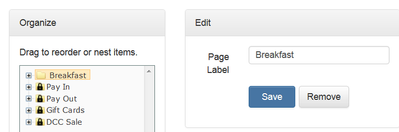
To configure the profile, you will want to rename the default column.
1. Click on Default Column to select it.
2. When you do, the Edit column to the right will appear with the option to change the column's
name.
3. Type the name you want to give to your column.
4. Then click Save.
5. This will change the name of the column you highlighted.
Example:
In this example, there is a grouping called Lunch
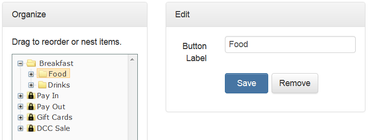
1. Under Breakfast, add sub-folders or containers.
In this example, the containers will be named grill, sandwiches, and sides.
2. Highlight the Breakfast column and click Add container.
3. Add the first container, save it, and repeat the process for the other two.
4. Now we have three new containers, each called New Container.
5. Highlight each and edit the Button Label to the right to Food and Drinks
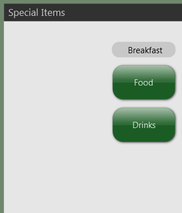
Let's look at how this appears on PRISMPOS.
1. In the cash register screen, click the Special Items button.
2. This is what we see on the screen:
Adding Items to the Menu Containers
Now that we have containers, we need to add items to those containers.
- Below is just an Example of NBC Testing System*****
-
-
-
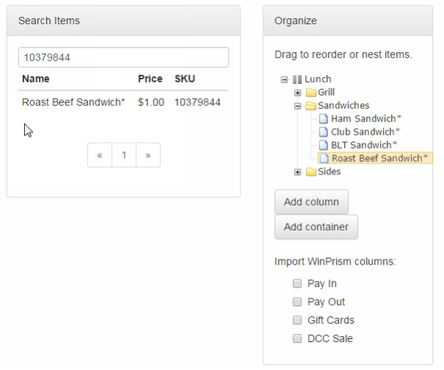
- In the Quick Menu Config screen, under Search Items, type the name or SKU of the first item you
wish to add.
2. Press Enter. The system will locate the item(s) which match your search criteria.
3. To add the item to a container, click on the item in the list, and drag it to the appropriate container.
4. Drop the item into the container.
-
-
-
-
-
- These Examples are specific to this Winprism ICS setup******
Example:
In this example, we are adding sandwiches to the sandwich container.
- These Examples are specific to this Winprism ICS setup******
-
-
-
-
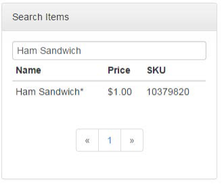
- To search by description, type Ham Sandwich into the Search Items field. The system finds the
Ham Sandwich from the ICS back office system, and displays it on the screen.
2. Drag and drop it into the Sandwiches container.
3. To search by SKU, enter the SKU in the Search Items field for a Roast Beef Sandwich.
4. Drag the Roast Beef Sandwich item under the Sandwiches container.
5. For the Special Items menu, select Lunch.
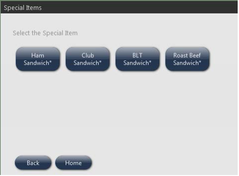
6. To sell the item, touch the item to sell, and the system will add the item to the transaction.